The 6.0 Powerstroke is an engine we all love to hate. It has earned a reputation for being one of the least reliable diesel engines produced over the last 20 years, and many owners will have received repair estimates which would cost more than the entire truck is worth. While I do agree the engine had some inherent design flaws, I still think the 6.0 Powerstroke deserves a little more credit than we give it. If you buy one second-hand, they are now very affordable, and still efficient on fuel, and they don’t have a lot of problematic emission equipment to deal with. If you plan on buying or owning a 6.0, there are a few expectations you need to have, and a few key upgrades you must do, but overall, I think it can be a reliable powerplant once the issues are taken care of.
One of the most common problems on a 6.0 is a failed EGR cooler, and while it’s not terribly difficult to replace on its own, the root cause of the problem is usually somewhere else in the cooling system. If you don’t do your research, or if you take your Powerstroke to a shop that doesn’t know how to properly diagnose and repair your Ford, you can wind up buying parts twice. But, with a little research and the correct parts, you can repair your Powerstroke once, and enjoy it for many miles to come.
A Chip Off the Old Block
In contrast to the 6.0 Powerstroke, its predecessor the 7.3 was one of Ford’s most reliable diesel engines. Although it could run for nearly a million miles and easily get over 20 MPG, it lacked in horsepower compared to its competitors, so in 2003.5, its replacement the 6.0 found its way into the Superduty pickup. Initially, the 6.0 Powerstroke won a place on Ward’s 10 Best Engines list for 2003, and it produced 325hp and 560 lb.ft. of toque. Much like the 7.3 that came before, the 6.0 utilized a HEUI injection system, but now featured four valves per cylinder and a variable geometry turbocharger to produce tons of low RPM torque as well as higher RPM power as well. Some of the notable issues you may run into on a 6.0 include head gasket failures (due to weak factory head bolts), sticking injectors, a failing VGT mechanism, and the usual assortment of sensor issues, the main problem we’re focusing on today is the EGR cooler and the engine oil cooler.
Because engine oil is used to lubricate the rotating assembly as well as actuate the fuel injectors, a lot of heat is created in the oil. In order to keep the oil temps under control, a liquid-to-liquid heat exchanger (commonly known as the oil cooler) is mounted on the front valley of the engine right below the oil and fuel filter. Engine oil is pumped through one side of the heat exchanger, and coolant circulates through the other, and the two passageways are very close to one another which transfers heat from the engine oil into the coolant, and finally into the radiator where the heat is exhausted into the atmosphere. Due to the casting process used to manufacture the block, there are a lot of small silica particles that are trapped in the water jackets of the cooling system, and over time, the small particles loosen up and make their way through the cooling system. The problem arises when they circulate through the engine oil cooler, because the passageways are so small, the silica clogs up the ports, and eventually all coolant flow is blocked off rendering the heat exchanger useless. Thankfully, the engine oil will continue to flow, which means the bearings and injection parts will continue to receive lubrication (albeit at a higher temperature) but the problem arises on the engine coolant side of things. After it leaves the oil cooler, the coolant normally flows into the EGR cooler where it lowers the temperature of the exhaust gas before its ingested by the engine. When the coolant stops flowing, the internal temperature of the EGR cooler rises rapidly, and over the course of several heat cycles, the internal passageways can rupture, which lets coolant into the intake manifold.

It’s easy to realize that a failed EGR cooler can easily be caused by a blocked oil cooler, so both systems should be replaced, but many times technicians only replace the part that shows the symptom, rather than the part that is the root cause of the problem which will result in a second failed EGR cooler and having to do the job twice. To prevent this from happening, we’re going to walk you through the process or correctly diagnosing and repairing a failed EGR and oil cooler on a 6.0.
Diagnosing A Failed EGR Cooler
The first symptom a driver will notice when an EGR cooler fails is white smoke and a coolant smell coming from the exhaust, or a low coolant light on the dash. This loss of coolant can also be an indicator of a failed head gasket, so further investigation needs to happen. To narrow down the problem to the EGR cooler, one simple test involves monitoring the flow of air bubbles in the radiator degas bottle.
Hook up a clear plastic hose to the top of the degas bottle and seal it off so its air tight. Run the other end of the hose into a water bottle that’s half filled and submerge the end of the hose. Start the engine and look for a steady stream of air bubbles. This means exhaust or combustion pressure is somehow entering the cooling system. If the bubbles disappear when you unplug the VGT actuator, that points towards an EGR cooler, but if the stream of bubbles is unchanged, that means pressure is entering the cooling system from a failed head gasket. To visually confirm it’s the EGR cooler, remove the EGR valve and look inside the intake manifold. If you see any moisture, that confirms it’s the EGR cooler. But the real question is, did the EGR cooler fail because it was simply old and saw too many heat cycles, or did a failed engine oil cooler cause the problem?
Diagnosing A Failed Oil Cooler
The simplest way to diagnose a clogged oil cooler on a 6.0 is to go for a drive. You will need an OBD2 based scan tool that can read the parameters for engine oil temperature as well as engine coolant temp. While driving at normal operating temperature. There is a 15-degree allowable margin between the coolant and oil temperature, so if the oil temp exceeds the coolant temp by 15 degrees or more, than the oil cooler is clogged and needs to be replaced.
What Parts You Should Install
If you’ve made it this far, chances are you have come to the realization you need to replace both the oil and EGR cooler in your 6.0 Powerstroke, so of course you’ll need to buy one of each, but what brand is best and are there any other upgrades you should consider while you’re doing the job?

For the EGR cooler, an OEM replacement would not be my first choice. They will last a long time, but there are better options available. Bulletproof Diesel makes an EGR cooler that uses a “braided tube” design that features TIG welded stainless steel tubes that are twisted around one another, which creates a stronger core that has greater surface area for heat transfer, which means the exhaust gasses will be cooler once they enter your intake manifold. Bulletproof Diesel EGR coolers come with a lifetime warranty, but just make sure you order the correct one for your 6.0, since there is a round and a square style, and they do not interchange. Trucks built before 9/22/03 use the round version, and trucks built after 9/22/03 use the square style.
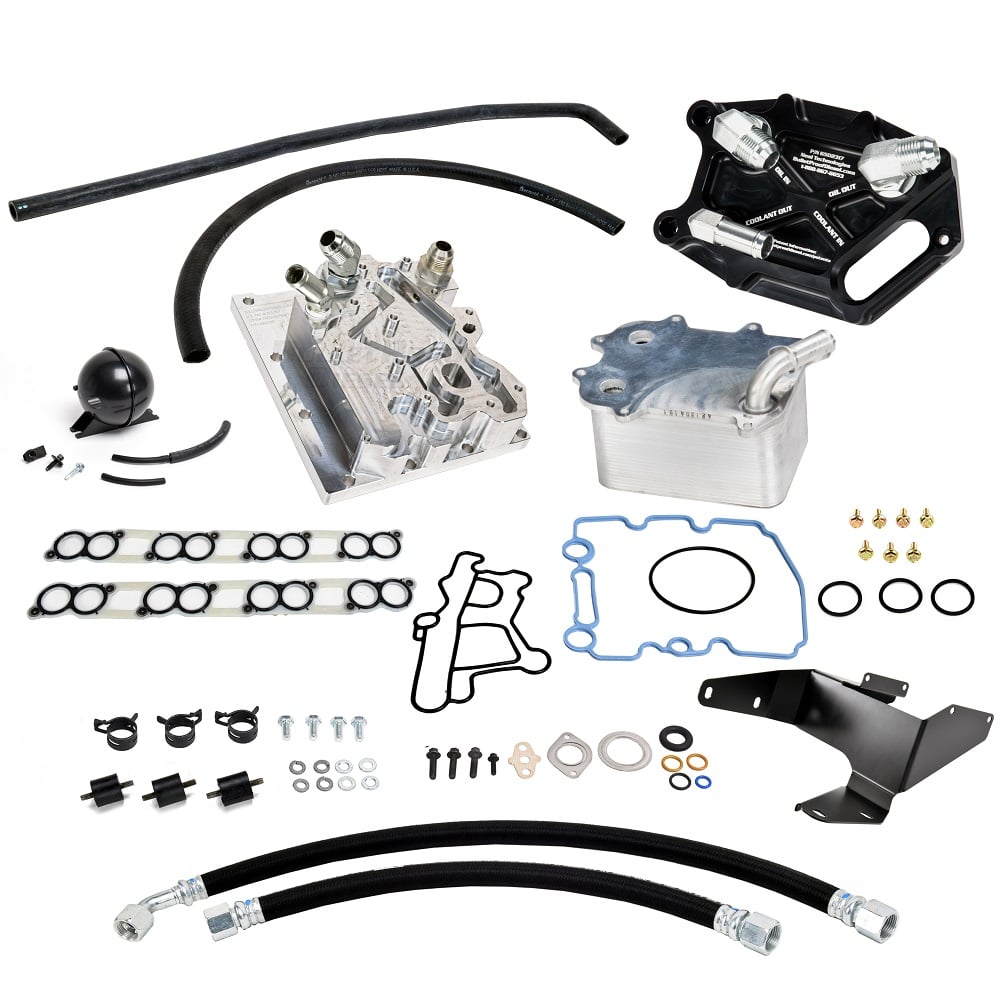
For the engine oil cooler, you’ve got two choices in my opinion. The first option is the updated Ford OEM oil cooler. They are available in a kit that includes all replacement gaskets and O-rings needed, as well as the small filter screen for the HPOP feed. The second option for a six-liter oil cooler would be to upgrade and move the oil cooler to a remote location that’s a little cooler than the valley of the engine. A kit from Bulletproof diesel makes this possible by using a 6.7 Powerstroke style remote oil cooler and an adapter kit that includes the billet oil transfer block, all the necessary lines and fittings, as well as the mount which places the oil cooler directly behind the passenger side battery.
Regardless of which style of oil cooler you select, one upgrade I would consider a must-do on ANY six-liter is a coolant filtration system. BD Diesel makes a great kit which easily installs into your existing hoses and uses a spin on filter to trap sediment and dirt before it clogs up your new oil cooler. It is recommended you completely drain and flush your cooling system when you install it, and it’s a good idea to change the first filter out after a couple hundred miles, but after that, you can swap the filter every six months to keep the coolant free of sediment and dirt.
How To Install an EGR And Oil Cooler On A 6.0 Powerstroke
Much like all the projects we discuss in this series, replacing the oil cooler and EGR cooler on a 6.0 aren’t difficult jobs to tackle, although they are time consuming because so many parts need to come off to gain access, and space is limited on top of the engine. Starting with the easy stuff, the coolant needs to be drained, the degas bottle comes off, the turbo inlet pipe and air filter are removed, the FICM (fuel injection control module) is unplugged and removed along with the serpentine belt and alternator, the intercooler tubes on both sides, fuel lines going into the fuel bowl, plus the oil feed and return lines going to the turbo. Next the upper oil and fuel filter housings are removed, and it’s time to attack the turbo. You’ll have to disconnect the down pipe (but it can stay in the truck) and the up pipe, both of which are held in place with V-band clamps. Because of age and a little rust, it might take a screwdriver or pry bar to pop the V-band clamp loose once the nuts have been removed. Next, there will be three bolts that hold the turbo to the pedestal, and once they’re removed, the turbo can be wrestled out of the valley of the engine. Make sure you’ve disconnected the wiring harness from as many places as you can so it can be maneuvered out of the way as the turbo comes out.
With the biggest chunk out of the way, the turbo pedestal can be removed, followed by the clamps that hold the EGR cooler to the passenger side up pipe. There will be a few coolant hoses going to/from the EGR cooler that need to be removed, and the next goal is to remove the intake manifold. It’s shaped like a horseshoe and has a series of bolts along each cylinder head, and once they’re all removed, the intake manifold and EGR cooler can be removed.
Now the oil cooler housing will be fully exposed at the front of the valley of the engine, so you can unbolt and remove it. This step is messy since there is a small reservoir of oil underneath, so be prepared. You’ll have to clean out all the oil in the valley of the block and thoroughly clean the area under the oil cooler. There will be a small screen that needs to be removed and replaced (a new one should come with the oil cooler kit) and this step is important because the screen will prevent dirt and debris from entering the IPR valve (injection pressure regulator) that’s mounted to the high-pressure oil pump (HPOP). Once the block is clean, you have full access to the high-pressure oil pump, so if you decide to replace the STC fitting on a 2005+ model, the IPR valve, or even the HPOP itself, now is the time to do it.

With the oil cooler assembly on the table, you can now push the heat exchanger brick out of the housing, and thoroughly clean everything to remove any traces of oil and dirt.
Once its clean, I like to take a red Scotchbrite pad and gently scuff all surfaces where an O-ring seals to ensure there’s no residue or dried on rubber from the old O-rings that might cause a small leak, or any sharp edges that may cut the new O-ring as its installed. Once that’s done and you see shiny smooth aluminum, blast it one final time with some brake clean or shop solvent, and hit it with compressed air to make sure there is no aluminum dust or dirt remaining on the surface, so no contamination is sent into the high-pressure pump or engine bearings.
Apply a little engine oil or Vaseline onto the oil cooler O-rings, and gently push the oil cooler brick into the housing. Once its secure, you can reinstall the oil cooler assembly onto the engine block with new seals (don’t forget the screen for the HPOP feed). Back at the table, remove the failed EGR cooler from the intake manifold and discard. Clean up any coolant or oil that might be inside the intake manifold, attach the new EGR cooler, and from here, you’ve got to reassemble everything in the opposite order that it was removed. As you put everything back together, keep an eye out for any other hoses or lines that might be a little brittle or dry rotted. Two lines that are especially important to look at are the oil feed and drain line for the turbo, as they can degrade internally and prevent oil from flowing through the turbo. Also, inspect the wiring harness as you plug it back in to make sure nothing has chaffed through, which could create electrical problems. Once everything is back together, change the engine oil and filter, install a new fuel filter, fill the engine with new coolant, and go for your test drive.
It’s Worth It
I’m a big supporter of doing repairs yourself and firmly believe everyone should own the basic tools required to repair their own vehicle. Thankfully with a few parts and some research, you can keep your aging six-liter on the road for many years to come all while saving a few dollars in labor at the same time. Plus, the absolute best part of owning a 6.0 Powerstroke is the smile you’ll get every time you step on the loud pedal and hear the glorious song coming from the exhaust pipe.


Your description of disassembly and assembly is excellent to have pictures to go along with those would be great.